
Are you planning to formulate your perfect Yoga routine? Well, what is essential is that you need to figure out the best time for doing Yoga. morning Yoga has become a come a popular concept in recent years. Health benefit of doing different morning yoga poses is that you feel energized.
Secondly, you are able to carry out your day to day activities with immense optimism. However, what is crucial is that you need to figure out the best yoga poses which will offer you the maximum benefit at the end of the day. We will talk about different morning yoga poses which you can include in your daily routine.
A 10 Minute Morning Yoga Sequence for Beginners.
Trending Yoga Poses for Morning Yoga:
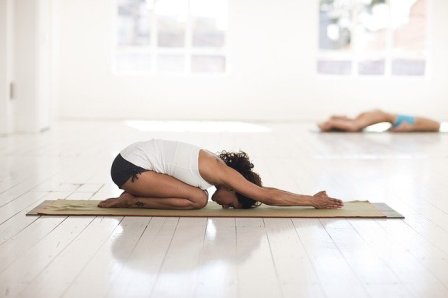
- Child pose:
When you want to stretch your hip and back muscles, then the best approach is to indulge in Child pose. What you need to do is lean forward in the Child pose. Make sure that you keep your buttocks on the heels. Consider resting your forehead forward on the floor.
The best part is that when you practice Child pose on a regular basis, then you will be in a position to reduce your inner thighs.
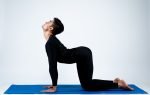
- Cat Cow:
When we talk about Cat Cow pose, then it tends to give a gentle flow to your body. The best thing about this pose is that it helps to warm up your body. Plus, it helps to bring flexibility to the spine. The Cat Cow pose tends to activate your abdominal and upper back muscles.
You need to start this pose on your hands and your knees. The wrist should be directly under your shoulders. The knees should be directly under the hips. Initially, you will move into the cow pose. Start inhaling as you drop your belly towards the mat.
Next, lift the chin and the chest. Start gazing up towards the ceiling. Now, you will move into the cat pose. When you exhale, try drawing your belly to the spine. Your back needs to be rounded towards the ceiling.
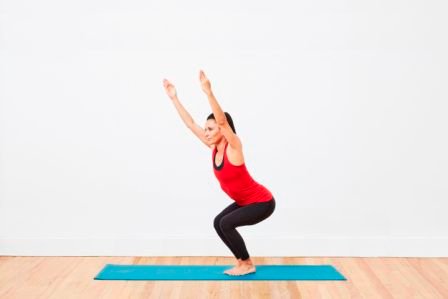
- Chair Pose:
Well, Chair Pose is a standing pose that tends to tone your entire body. It particularly works on the thigh muscles and helps to reduce your thighs. What is worth mentioning about Chair Pose is that it will help in stabilizing your knees.
You need to stand straight when you want to perform the Chair Pose. Your feet need to be slightly wider than the width of your hips. You need to start inhaling and lift the arms up. Next, you need to inhale and you have to bend your knees. Make sure that you bend your torso in a way that it helps to create a right angle.
The Chair pose tends to target your lower body muscles. It works on your waist and your hips.
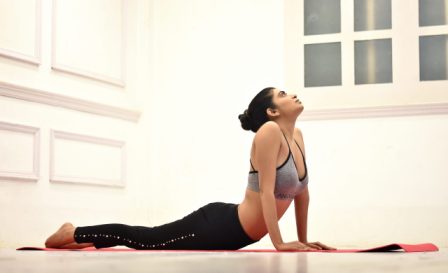
- Cobra Pose:
The best thing about Cobra Pose is that it is immensely effective for fatigue because it tends to stretch your shoulders. To perform the Cobra pose, you will need to lie flat on the floor. The top of your feet and your thighs need to be firmly into the floor.
When you inhale, you need to straighten your arms and lift your chest from the floor. You need to reach a height where it is possible for you to maintain a connection through the pubis to the legs. You will need to hold this pose for about 15 to 30 seconds.
Now, release back to the floor in the end and you need to do perform this with an exhalation.
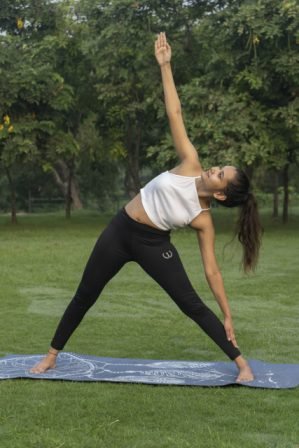
- Triangle Pose:
Well, the Triangle Pose is a standing position which helps you in improving your focus. You need to face the long side of the mat when doing the Triangle Pose. You need to turn your right foot out so that your toes point to the short edge of the mat.
The left foot needs to be turned in at an angle of 45 degrees. It is essential to lengthen through both sides of the waist. You need to inhale when you extend your body over to the right leg. Now, you need to exhale as you bring your right hand down. Trying out this pose is beneficial because it tends to energize your body.
The primary muscles which benefit from this pose are the thighs.
Morning yoga Poses for Intermediate Routine:
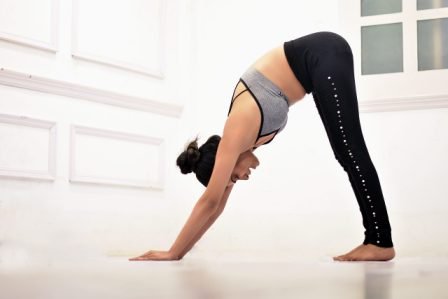
- Downward Dog Pose:
When you want to practice an inversion asana, then Downward Dog pose is the best option to try out. You need to start off on all four to perform the Downward Dog. Your Knees need to be behind your hips. It is essential that your hands are shoulder-width apart.
Start pressing your hands into the mat. The toes need to be tucked under. Now, it is time that you start taking a deep inhale. The hands need to continue pressing into the mat and you need to exhale. Start lifting your knees off the floor and make sure that you straighten your legs.
The Dog pose helps to strengthen your wrist. At the same time, it strengthens your back muscles and the shoulders.
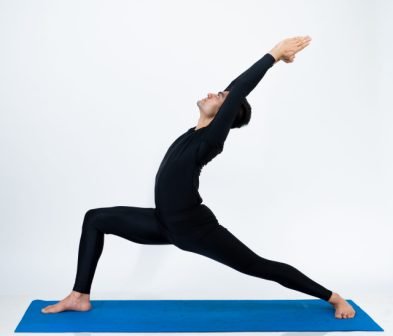
- Warrior 1:
When we talk about Warrior 1, then it is yet another standing pose. The best thing about this pose is that it helps to build stability. Stand up and your right foot needs to be stepped forward. Your foot needs to be in a parallel position. The toes need to point to the top of the mat. Your left leg needs to be straight at this point in time.
Your left heel needs to be turned at an angle of 45 degrees. Start raising your arms above your head. Make sure that you squeeze your shoulder blades at this point in time. Start lifting the chin for gazing at the hands overhead.
The best thing about Warrior 1 Pose is that it stretches the lungs and the shoulders.
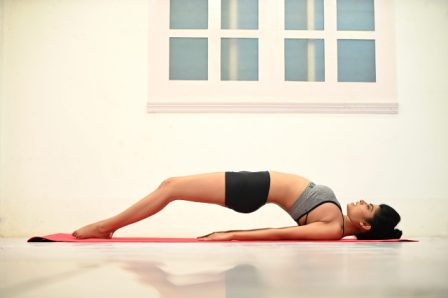
- Bridge Pose:
You cannot move to complex back bends right away. As a result, you need to start with something simple. We can term the Bridge Pose as an initial level back bend. You need to lie on your back at the center of the mat. The Knees need to be bent at this point in time.
You need to press down firmly through both the feet. Next you need to inhale and raise your hips. It is essential that you clasp your hands under the back. To finish off the pose, you need to exhale and release the lower to the floor.
What the bridge pose does is that it tends to strengthen the gluts.
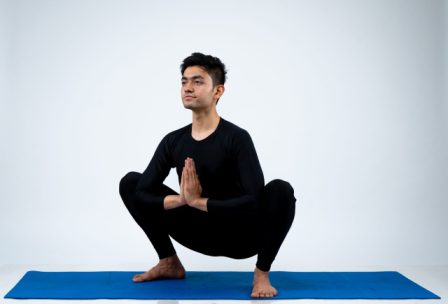
- Garland Pose:
When you want to stretch your ankles and the groins, then going for Garland Pose is a smart option. Your feet should be mat width apart when you do the Garland Pose. Now, you need to start bending your Knees. The butt also needs to be lowered towards the floor.
You need to acquire the Squat position. Your upper arms need to be inside your knees. Bend the elbows in a way that it helps to bring the palms together. Your hands need to be with the heart center. Start bending the elbow so that you are in a position to bring the palms together.
You need to continue pressing the upper arms into the thighs. Ensure that your spine remains straight at all times. When you want to build up the muscles in the thighs, then garland pose is a great option.
Make sure that you include these yoga poses in your daily routine and the results are worth it.
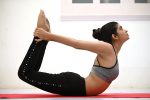
- Bow Pose:
Well, Bow Pose is yet another back bending asana. First you need to lie flat on your stomach. Your hands need to be on the sides when you lie on the mat. Initially exhale when you bend your knees. Try bringing your heels close to your buttocks.
Now, you need to start lifting your hands and take hold of the ankles. Consider grabbing your ankle. It is time to start inhaling and try lifting your heels away from the buttocks. At the same time, you need to lift your thighs, chest and head. Your shoulders need to be rotated as you lift. The core should be touching the mat at this point.
Try drawing the tailbone to the mat for deepening the stretch.
You need to look straight and hold this pose for at least 15 seconds. Finally, you need to exhale and release the pose. The best thing about Bow pose is that stretches the abdomen.
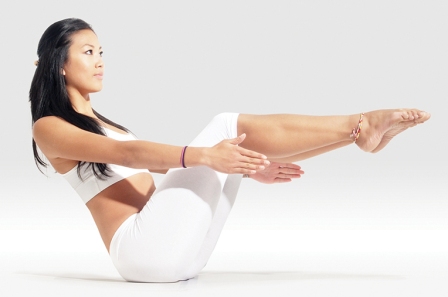
- Boat Pose:
When you want to build up core strength and build up the abdominal muscles, then Boat Pose is the best pose to choose. To perform the boat pose, you need to sit in a seated position. Your knees have to be bent and the feet need to be flat on the floor.
Try lifting your feet off the floor. Make sure that your knees are bent initially. Your shins need to be parallel to the floor. Well, this gets termed as half boat pose. However, make sure that your spine should not be round at this point in time
Try straightening your legs to an angle of 45 degrees. The shoulders need to be rolled back. Your arms need to be straightened parallel to the floor. The palms need to be turned up. You should try balancing on the sit bones.
You should stay in this position for at least five breaths. Consider releasing your legs and exhale.
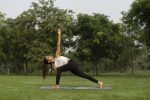
- Extended side angle:
When you want to acquire extension in your arms, then you need to do the extended side angle. The best thing about extended side angle is that it works to tone your lower body. When starting with this pose, your legs need to be four feet apart.
Consider extending your arms in a T-position. The palms need to be facing down. Consider reaching out through your fingertips. Your left foot needs to be turned out to an angle of 90 degrees. The right leg needs to be inward slightly.
Try lifting through the spine. The sides of your torso need to be equally long. Try pressing your right outer foot heel to the floor as you start bending your left knee at an angle of 90 degrees. Your left thigh needs to be parallel to the floor.
Try leaning towards the left knee. Consider hinging at the hips. Consider bringing the left arm towards the floor. Try reaching your right arm over the ear. The palm should be facing down. Consider turning your chest towards your raised arm.
Start pressing the right hip towards the floor for creating a straight line from the right ankle. You should turn your head in a way so that you can look past your right thumb. You need to breathe freely in this pose. You need to stay in this position for 30 to 60 seconds.
Start inhaling and reach up. Try bringing the Torso up and straighten your left leg. Make sure that you keep switching sides.
Advanced Yoga Pose for Beginners:
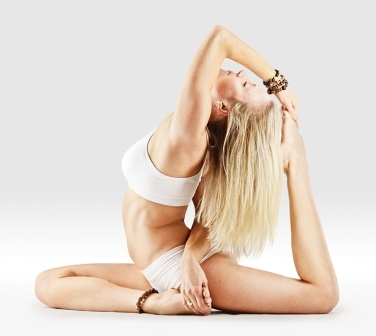
- King Pigeon:
When you want to strengthen the muscles in your lower back, then King Pigeon Pose is an excellent option. To perform the King Pigeon Pose, you need to begin in a Downward Dog pose to perform the King Pigeon Pose.
You need to be on all fours to start this pose. You need to place your hands in front of you on your mat. Try pressing into your hands and feet. Now start straightening your legs and try raising the hips towards the sky.
Your body should be in a V position. Start raising your right leg off the ground. Try bringing the right knee to the back of the right leg. Next, try rotating the right shin so that it can be parallel with the front of your mat.
Try bringing the right knee outward so that it becomes further to the right than the hips. The right foot needs to be flexed towards your shin. Now start lowering your right buttocks towards the ground. However, it is crucial that your weight should be even distributed between your hips.
Try pressing both your hands under your shoulders and start pressing into the palm of your hands. As a result, you will be in a position to elongate your spine. You should be looking straight at this point in time.
Take a deep breath and start exhaling. Try lowering the torso over the right leg. Try stretching your arms straight in front of you. The elbows should be bent. You should be placing your forehead on a yoga block.
Try bringing the shoulders back away from your ear. You need to maintain this position for at least 5 to 10 breaths.
- Peacock Pose:
When you want to indulge in hand balancing yoga, then Peacock pose is an excellent pose. You need to start the Peacock pose in an upright position. You need to sit on the knees and the heels. Make sure that there is some distance between your knees.
When you want to indulge in hand balancing yoga, then Peacock pose is an excellent pose. You need to start the Peacock pose in an upright position. You need to sit on the knees and the heels. Make sure that there is some distance between your knees.
Start leaning your shoulders forward and place the hands on the ground. When you start leaning forward, it is crucial that your elbows should be bent. Your hands and elbows need to be towards your heart.
Your palms need to be pressed into the floor. Your torso needs to press against the back of the upper arms. Now, start unbending your knees and extend the legs behind you. The toes should be facing the floor.
The body weight needs to be evenly distributed between your hands and feet. You need to start squeezing your thighs so that the legs start to become one single unit. Try lifting your feet off the ground one at a time.
Try lifting your head and look forward. You need to hold this pose for at least 15 to 30 seconds. When you have to release this pose, then lower the feet to the ground.

- Dove pose:
When you want to open and lengthen your torso, then you need to try out the dove pose. You need to start off by kneeling on the floor. Your back should be straight at this point in time. Your arms should be resting on the sides.
Now, you need to start leaning back. Your hands should be on the floor behind you. The fingers need to face inward. Start lowering your elbows on the floor. As a result, your entire forearm should be on the floor.
Start arching your back. Start lifting your thighs up, Try moving the hands towards the feet. Now, straighten your arms.
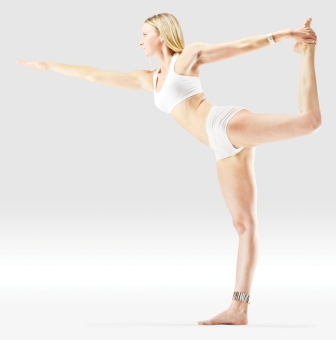
- Lord of the Dance:
You can think along the lines to perform Lord of the Dance pose. First, you need to adopt the mountain pose. You need to activate your root foot. Now, start to exhale, and start bringing your left leg back with your left hand.
Make sure that your Torso should be straight and upright. Try pulling your shoulders down as you arch into this pose. You need to stabilize your body on the standing leg. Try holding the pose for 30 seconds. Exhale and bring your leg down slowly.
Make sure that you center yourself in the Mountain pose and repeat the whole posture on the other side.
- Headstand:
When you want to try out an advanced yoga inversion, then Headstand is a great option. There is no denying the fact that a headstand can be perfect for calming the mind. You need to sit in a Thunderbolt pose.
Now, you need to measure the elbow width and you need to place your opposite hands at the inside base of your upper arms. Now, you need to create a triangle shape with your forearms. Consider interlacing the fingers.
Consider placing the tips of your pinky finger together. Now, place the top of your head on the mat. Consider lifting your hips and straightening your legs. It is time to walk your feet towards the head. Start bringing in your knees towards your chest.
Consider holding this position for five seconds. Consider straightening your legs slowly.

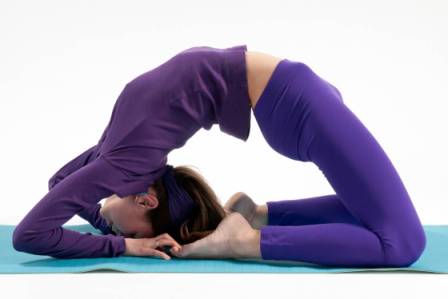
- Headstand Lotus:
When you want to acquire the perfect control over your body, then trying out Headstand Lotus is a great option. The pose stimulates your Kidneys and Thyroid function. Initially, you will need to perform Sirshasana. Once you are able to establish balance, start bending your right leg.
Consider keeping your right leg on the right thigh. The left leg should be on the right thigh at this point in time. Start breathing slowing through the nose. You need to remain in this posture for five to ten minutes initially.

- Firefly:
When you want to strengthen your forearms and wrist, then Firefly pose is the best option. First, you need to start in Standing Forward Bend. You need to take the right hand through the legs for clasping your right calf. Your right shoulder should be behind the right knee. Now, consider placing the right hand on the floor behind the heel with your fingers facing forward.
Repeat the same exercise on the left side.

- Tadasana:
Well, Tadasana is a standing yoga position. The pose tends to target the whole of your body. You should stand with your feet parallel to the ground. Consider lifting and spreading the toes. Now, lay back your feet on the floor.
Now start rocking back and forth. Plus, you need to rock side to side also. Consider lifting the sternum top towards the ceiling. Make sure that you widen your collar bones. Let the shoulder blades draw towards each other. Allow your arms to relax behind the torso. The crown of your head should be balanced over the pelvis center.
Breathe in this pose.
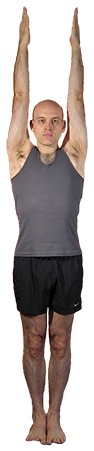
- Urdhva Hastasana:
Well, Urdhva Hastasana is a pose that works on the upper back, neck and the chest. Initially, you need to begin this pose in Tadasana position. Draw through the heels and consider straightening the legs. Lift the arches and the ankles of your feet. Start engaging your quadriceps. Do not forget to rotate your thighs inwards.
The tailbone should also be tucked. Start bringing your pelvis to a neutral position. The collar bones should be broadened. Consider elongating the neck. When you inhale consider sweeping your arms to the side. Next, move the arms overhead.
Consider tilting your hands back and gaze at the thumbs. Breathe smoothly now.
Try out all these yoga poses and your fitness is bound to improve.